NAVIGATION BAR

Showing posts with label htc. Show all posts

Monday, June 4, 2012

HOW TO ROOT HTC Rezound


HOW TO ROOT HTC Rezound


Video tutorial


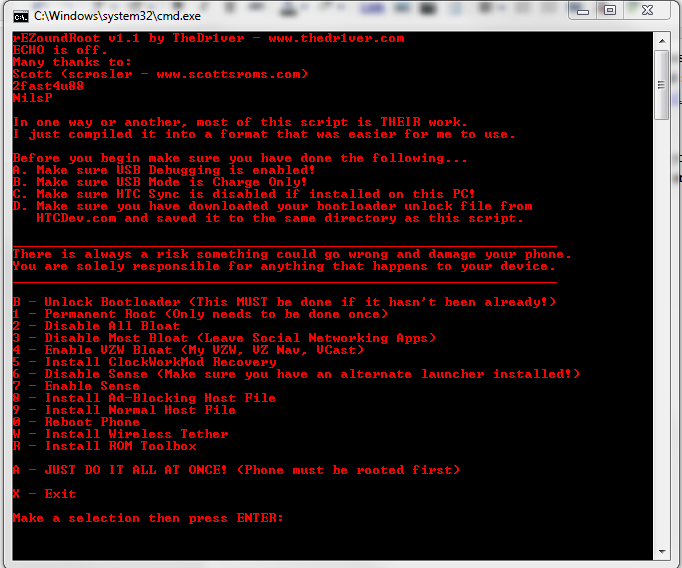
I've spent pretty much all day on this and wanted to get it out as soon as possible. There have been a lot of scripts floating around there that have a lot of great features, but not one that single-handedly did everything I wanted for my specific Rezound. Therefore, I've developed rEZoundRoot to help make the Rezound rooting process a little easier.

All you have to do is download the .zip file and extract it to somewhere on your hard drive. Then, copy your unique Unlock_code.bin that you obtained previously into the /tools/ folder and run the script. Follow the instructions and you're good to go!


UPDATE 1/4/2011: Fixed some typos, changed the recovery to install Amon Ra instead of Clockwork Mod, and fixed an issue where adb did not wait for the device before pushing ZergRush... Sorry for those who were having issues with getting root from the script.

UPDATE 1/31/2012: Actually added the Amon Ra recovery.img to the package. Previously had overlooked this and it was still installing the old version of Clockwork Mod.

UPDATE 3/5/2012: Updated to version 1.5 in order to reflect the most recent rooting process. Got rid of the Zerg Rush method because it's pretty much irrelevant now. Allows for either temp or perm pushing of Amon Ra recovery, which allows for the pushing of Superuser and SU per the provided instructions. Eventually I'd like to include the stock RUU in order to get those of us who didn't grab the OTA download all set up, but for right now I'm leaving it out to cut down on size. As always, leave questions in the comments. By the way... In case you haven't noticed by now, the text in the screenshot is red. The text in the actual program is blue. I'm not color blind, I'm just too lazy to update the screenshot... But you already knew that, didn't you?

Sunday, June 3, 2012

How to root Micromax A50

<--Rooting Micromax A50-->


This tutorial will tell you how to root your Micromax A50.All the credits goes to Varun Chitre for making the boot.img insecure.


So lets get started!
[/]Make sure you are not low on battery.
[/]Make sure your device is completely switched off.
[/]Take off your battery and put it back on,BUT DO NOT TURN ON THE DEVICE.


FIRST STEP :
Download the files
Here's the link for the full Root package for Micromax A50 :-
--------------------
a50_ROOT.rar


MIRROR :-
http://www.multiupload.nl/YER4CIZ0HY
--------------------
__________________________________________________ ________________________________________


STEP 2 :
Setting Up Things
Extract all the files from the rar package above.After extracting it should look like this :
This image has been resized. Click this bar to view the full image. The original image is sized 754x286.

Now extract files from "mt65x3-usb-vcom-drivers.rar" and open InstallDriver.exe,It will install the drivers needed for the Flashing Process.(Open installdrv64.exe if you have a 64-bit system)


Now open "SP Flash Tool v2.1134.00.7z" and extract the contents to a new folder.
This is the software that you will use for the flashing process.


Now you need to install UnLock Root.This is the software that will root your Device.Open "unlockroot23.exe" and install it.


MT6573_Android_scatter is needed for starting the flashing process.


usb_driver.zip will stay there for now,But you will need it later.This zip file contains the ADB Drivers that is required for the rooting process.


orginal a50 boot.img folder contains the stock boot.img file of A50.So if anything goes wrong and your phone is not booting up,You can flash this file,and it'll be back to normal.


__________________________________________________ ________________________________________


STEP 3:
Flashing Insecure boot.img
After you've done setting up things,it's time for flashing!
Open SP Flash Tool (Flash_tool.exe),
And Select File>Open Scatter loading file and select MT6573_Android_scatter.txt.And Uncheck everything on the list for now.
This image has been resized. Click this bar to view the full image. The original image is sized 846x554.


Ignore any errors that will pop up like these :


Single click on BOOTIMG and select the boot.img provided in the package.
This image has been resized. Click this bar to view the full image. The original image is sized 852x561.


Take out the battery, put it back and without turning on the device Connect it to your PC with the USB cable without pressing any button on the phone. Now windows should find the drivers and install it. After drivers are installed, unplug the cable from your phone. Take out the battery from the phone and put it back again. Do not switch on.


After you've done that,Hit F9 or Click on the "Download" button.
This image has been resized. Click this bar to view the full image. The original image is sized 851x556.


Then under 
15 seconds,connect your device to the PC.You will see a yellow progress bar,When it reaches 100% a pop up window will appear saying BOOTIMG downloaded.
Now that you've successfully flashed the boot.img,Unplug your phone, take the battery out, put it back and start the phone normally as you do. Let it fully boot.


__________________________________________________ ________________________________________


STEP 4:
Rooting Process


Now your device is ready to root! In your device Do the following
Go to settings->Applications->Check unknown sources.
Go to settings->Applications->Development->Check USB Debugging.
This image has been resized. Click this bar to view the full image. The original image is sized 729x480.


Now you need to install ADB Drivers,First Extract 'usb_driver.zip'.To install ADB Drivers,Plug in your device to your PC,without turning it off,And do not mount SD Card.When you plug in,Windows will try to find drivers for "MICROMAX A50" and will simply fail.Don't Freak Out,Now go to Device Manager From Start Menu,Right click on 'Micromax A50' and click 'Update Driver Software'.On the new window, click 'Browse my computer for driver software', then click 'Let me pick from a list of device drivers on my computer'.Click 'Have Disk'. On the new Pop-up window, click 'Browse'And select 'android_winusb.inf' from the folder you extracted from 'usb_driver.zip'.Now,From the list,Select Android ADB Interface and click next,A Warning will pop up saying "Would you like to install this device driver software. Click Install.And the drivers will be installed.Thanks to kankfraud for providing drivers.


Open unlock root on your PC and click on ROOT!The program will root your device.When finished,it will ask you to restart your phone. So switch it off and switch it on again.


Now go through your Appdrawyer,You should find an application called Superuser.If you do,Then your device has been rooted!


This rooting method has been tested by kankfraud .I'm not responsible if something happens to your device.

PRODUCTS


Here you can find the products and what you want. If can't find the link for the searching products just stay tuned we are Working hardly for the particular modes....
Thank you for visiting our site...

Models are given below

HTC


HTC EXPLORER
HTC WILDFIRE S
HTC INCREDIBLE S
HTC Amaze 4G
HTC Desire
HTC Desire C
HTC Desire HD
HTC Desire Z
HTC Droid Eris
HTC Droid Incredible 4G
HTC Edge
HTC EVO 3D
HTC Evo 4G LTE
HTC EVO Design
HTC EVO Shift 4G
HTC EVO V 4G
HTC Fireball
HTC Hero
HTC Hero (Sprint)
HTC Hero S
HTC Inspire 4G
HTC J
HTC Legend
HTC Leo (HD2)
HTC Magic
HTC Merge
HTC Primo
HTC Salsa
HTC Status
HTC Tattoo
HTC Vivid

 SAMSUNG


Samsung Galaxy Gio 
Samsung Galaxy Ace
Samsung Galaxy Indulge
Samsung Galaxy Lite
Samsung Galaxy M Style
Samsung Galaxy Mini (S5570)
Samsung Galaxy Mini (SGH-T499V)
Samsung Galaxy Mini 2
Samsung Galaxy M-Pro
Samsung Galaxy Nexus
Samsung Galaxy Note
Samsung Galaxy Note LTE
Samsung Galaxy Pocket
Samsung Galaxy Portal
Samsung Galaxy Precedent
Samsung Galaxy Prevail
Samsung Galaxy Pro
Samsung Galaxy Proclaim
Samsung Galaxy S2 (Sprint)
Samsung Galaxy S2 (International)
Samsung Galaxy S2 Skyrocket
Samsung Galaxy S2 Skyrocket HD
Samsung Galaxy S2 HD
Samsung Galaxy S2 X
Samsung Galaxy S 4G
Samsung Galaxy S Advance
Samsung Galaxy S Aviator
Samsung Galaxy S Blaze 4G
Samsung Galaxy SL
Samsung Galaxy Spica
Samsung Galaxy S Wifi 4.2
Samsung Galaxy W
Samsung Galaxy Xcover
Samsung Galaxy Y Duos
Samsung Galaxy Y-Pro
Samsung Galaxy Y-Pro Duos
Samsung Gem
Samsung Gravity Smart
Samsung Hercules
Samsung Illusion
Samsung i7500
Samsung Infuse 4G
Samsung Intercept (Sprint)
Samsung Intercept (Virgin Mobile)
Samsung Mesmerize
Samsung Moment
Samsung Replenish
Samsung Repp
Samsung Rugby Smart
Samsung Stratosphere
Samsung Transfix
Samsung Transform
Samsung Transform Ultra
Samsung Vibrant
Samsung Vitality


MOTOROLA

MOTOROLA DROID X(ICS)
MOTOROLA DROID X(CLOCKWORK MOD 5.0.2 
Motorola Admiral
Motorola Atrix 2
Motorola Atrix 4G
Motorola Backflip
Motorola Bravo
Motorola CHARM
Motorola Citrus
Motorola CLIQ
Motorola CLIQ XT
Motorola Defy
Motorola Defy Mini
Motorola Defy (Plus)
Motorola Devour
Motorola Dinara
Motorola Droid
Motorola Droid 2
Motorola Droid 4
Motorola Droid Bionic
Motorola Droid Fighter
Motorola Droid Pro
Motorola Droid Pro (Plus)
Motorola Droid RAZR
Motorola Droid RAZR MAXX
Motorola Droid X2
Motorola Electrify
Motorola Fire
Motorola Flipout
Motorola Flipside
Motorola i1
Motorola Milestone
Motorola Milestone 2
Motorola Milestone 3
Motorola Milestone X
Motorola Milestone X2
Motorola Motoluxe
Motorola Photon 4G
Motorola Pro
Motorola SPICE Key
Motorola QUENCH
Motorola Titanium
Motorola Triumph
Motorola XPRT
Motorola XT531
Motorola XT720
Motorola XT928


MICROMAX


Micromax A78


DELL

Dell Flash
Dell Streak (Mini 5)
Dell Streak Pro 101DL
Dell Venue


Saturday, June 2, 2012

How to Root HTC Incredible S – Tutorial


How to Root HTC Incredible S – Tutorial


While Samsung chooses to simplify its products when it comes to Android by keeping things open to its users in terms of customization Motorola and of the latest HTC too joined to bandwagon to strengthen their phones thy making it difficult for its users to root or customize their phones. If you are some what creative and wants to try new things or customize your Androidthen Motorola with its thunderbolt and Incredible S will disappoint you. Though there’s no permanent root solution available for the Incredible S users, we have managed to bring on a temporary make shift solution with which you will be able to root your HTC Incredible S.
Please note that rooting voids the warranty, though the warranty can be claimed back once the device is un rooted, as it’s just a temporary root, the Incredible S can be un rooted just with the help of a simple restarting of the device. Basically there are two types of rooting methods, one is the permanent root and another one is the temporary root. In the permanent root even if you reboot the device the device will stay rooted but whereas in the temporary rooting process with the help of a simple reboot, the device will be un rooted. Though both has its own set of advantages and disadvantages, as of now since only temporary root is available, we will see on how you can temporary root your phone. Please note that this process is only applicable for HTC’s Incredible S and to not any other phone, if you apply the below mentioned procedure for any other HTC’s device then there’s a high potential that you may end up bricking your device.
Before proceeding to the procedure on how to root the HTC Incredible S, make sure that battery is charged to a minimum of 50% or else your device will get switched off in the middle of the process due to which the rooting process will not be completed. Also, additionally its recommended to create a backup of all the data which is there in your phone in the computer as in an unlikely event you may lose all the data which is present in your phone. Rooting has its own set of advantages and disadvantages the major advantage being that it unlocks the potential of device.

Procedure to Root HTC Incredible S:

  • First up you will have to download and install the ADB in your computer which can be done by following the instructional procedure only after which you will have to proceed, but before that you will have to turn on the USB debugging in your incredible S which can be turned ON by pressing the “Menu” key first then “Settings” > “Applications” > “Development”. Now here you will find an option of “USB debugging”, select the option and just accept the warning which it will pop up. It’s very important to put the device in the USB debugging and also important to go through the ADB setup process without which it’s not advised to proceed.
  • Now, next up you will have to download the Rooting package which you will have to unzip the same and need to place in the location path c:\adb after which you will have to connect the phone to the computer.
  • —–loop—–
  • Now, open the command prompt and key in the “cmd” and then you will have to make use of the change directory command so that the directory in which you have placed the rooting file can be accessed.
  • Next up type in the “pushroot” and enter the same, basically this will push in the pushroot.bat file.
  • After this type in adb shell /data/local/tmp/getroot and after that type in adb shelland press enter.
  • After typing in the above commands, you will now be prompted as # after which you will have to type in /data/local/tmp/pushroot.
That’s it you have now successfully rooted the HTC Incredible S, so from now whenever the device get un rooted, you will have to just enter the commands from the —-loop—- which is mentioned above. Do let us know if you get stuck anywhere as we will help you to get out of from there. Please note that as soon as we find a way with which you can Permanent Root HTC Incredible S, we will sure update with an article on how to root, so stay tuned to